In a pump manufacturing or repair facility, the balancing instrument can provide important information that, if used correctly, will improve the facility’s workflow and throughput.
The balancing machine can do more than simply obtain the unbalance measurement or define the correction needed for a single rotor.
The balancing machine and its selected instrumentation can also share, store and evaluate data on every rotor. This collective data can be examined and used to make improvements in many areas of a manufacturing or repair facility. Data collection makes the balancing instrument not only an important part of daily balancing activities but an asset to total facility operation. Many instrumentation features are available to help the operator balance effectively and efficiently on a daily basis.
Electronic Protractor
The electronic protractor (visual angle indicator) feature assures accurate location of the unbalance correction. This accuracy will enhance the operator’s ability to decrease the required balancing time for any given rotor. Note that an unbalance angle correction error of only 6 degrees would create an overall error amount in excess of 10 percent, resulting in under-correction of the rotor and additional time to complete the balancing task. By minimizing errors caused by improper transfer of unbalance angle to the rotor, the electronic protractor reduces balancing time. With the instrument’s ability to provide previous run history and mark the previous runs, the operator can evaluate the correction steps being taken to ensure correct angle and expected behavior.
Marking Feature
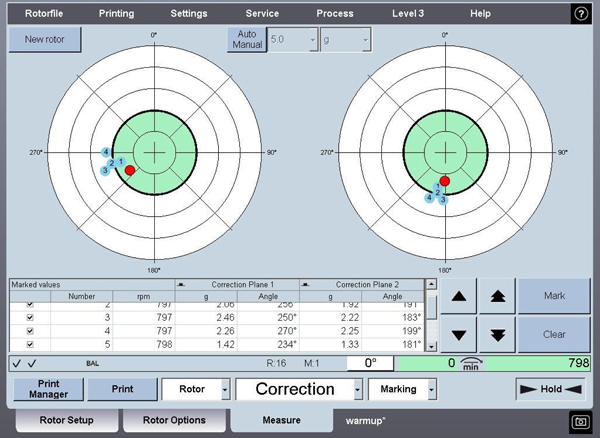
The ability to mark each run and visually indicate a group of measurements all on the same screen will help prove-out repeatability of the rotor and/or the rotor’s tooling. Run-to-run measurements are marked individually and the “scatter” of the grouping analyzed (see Figure 1).

Figure 1. This shows the marking of each run. Note the scatter grouping of the five marked runs showing the on-off repeatability of a pump on its arbor.
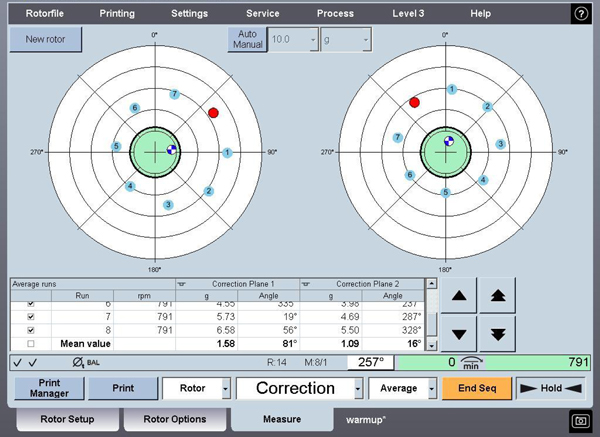
Using the marking feature along with an averaging function allows the operator to perform a residual unbalance traverse test, similar to the American Petroleum Institute (API) residual unbalance test used in the petroleum, chemical and natural gas industries. The averaging function will indicate each run on the instrumentation’s display screen and then perform an averaged value of the marked runs, indicating the resultant residual unbalance. These tools aid in checking the balancing machine and balancing process (see Figure 2).

Figure 2. This vector display shows the marked measurements of the traversed weight and the resultant residual unbalance (average) shown as the blue and white point within the green shaded tolerance band.
Tooling Compensation
Tooling compensation is another area in which the balancing instrument aides the operator and streamlines production. Index balancing helps ensure that the unbalance measured is the component’s unbalance and is not significantly influenced by tooling. The tooling influences the component’s unbalance measurement. This influence is a combination of the errors introduced by tolerance stack ups and clamping errors and the unbalance and geometric error of the tooling itself.
The geometric error of the tooling causes the rotor to be eccentrically positioned when it is installed onto the tooling. An index compensation procedure is carried out as a result, and the balancing instrument electronically compensates for the tooling influence. The instrumentation then displays the unbalance of the component itself.
Single Compensation
The balancing instrument also features single compensation. This software is ideal for the shaft and component set during the multistage impeller balancing process. After each stage is added to the shaft and balanced, the assembly is electronically compensated so that the residual unbalance is not corrected in each subsequent stage. This compensation is used after stacking each stage onto the assembly as a multistage impeller is built up.
Key Compensation
Key compensation acts as another useful instrumentation feature that calculates the unbalance effect of a shaft key. This allows the balancing of the remaining series of rotors without ever attaching a half-key again for this rotor type.
North American industry has standardized the half-key method in which shafts with keyways—in addition to mating components, such as impeller stages—are individually balanced with half-keys fitted to fill the void that the keys would have occupied in the final assembly. The instrumentation software intuitively takes the operator through the steps and then applies the compensation to the measurements going forward.
Rotor Photo Storage
Another useful feature is a rotor photo that can be stored and viewed by the operator for each rotor file. This photo can be a dimensioned photo or drawing with all the important mechanical and dimensional setup information. Captions remind the operator of certain steps to take or specific dimensions for setup. For example, this feature can be used to show where the axial thrust bearing should be positioned and where the left pedestal should be positioned with respect to the belt drive bracket.
With a detailed, stored image, any operator can properly set-up and operate the machine. Additionally, internal documents or manuals can be saved with each rotor file and are accessible from within the file itself. These PDFs outline the process steps that a machine operator may need to perform.
Data Management
The balancing instrument can be configured to use customized reports in which the data collected by the balancing process automatically transfers to a customized template for reporting documentation or certifications. The report can include items—such as company logos and relevant calculations—and the instrument will input the balancing data directly into it.
The balancing instrument can store and share all the unbalance data, from initial to final unbalance for each balanced impeller. Recording this data in a safe, secure location gives an authorized individual or review team the power to analyze every balancing run, including the important initial unbalance and the final unbalance (residual unbalance). The data review can indicate a trend of initial unbalances, pointing to a deficiency that may have occurred earlier in the manufacturing process. Through the company’s computer network, the data can be viewed offsite at multiple locations and transferred to spreadsheets and charts for graphical analysis. Networkable measuring instrumentation and a secure networking interface contribute to this accessibility.
Statistical Process Control
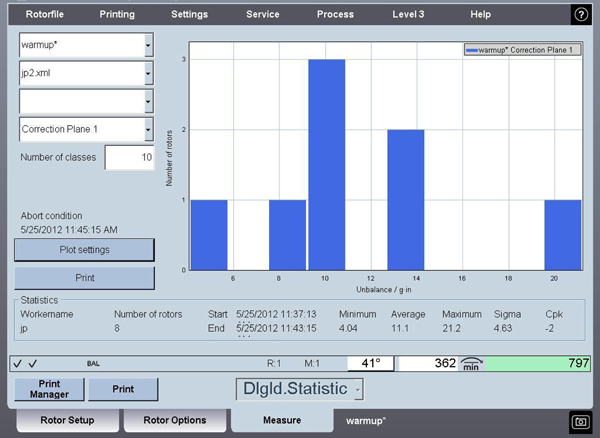
Statistical process control (SPC) can also be administered by the instrumentation. SPC can minimize waste and help address continuous improvement efforts of a particular process. An online statistical analysis software package is a valuable aid and, combined with the balancing instrumentation, can quickly chart the incoming unbalance condition of each impeller. The balancing machine’s instrumentation can automatically measure the overall incoming unbalance distribution of the incoming stock material (see Figures 3 and 4). This allows the operator to quickly diagnose their incoming material condition and aids in continuous upstream improvements, resulting in higher efficiency and throughput. Using these statistical tools, variations in the incoming material batch are detectable early on. Based on this feedback, Manufacturing is able to adjust castings and molds and improve the incoming unbalance condition. Less material removal is needed for balancing, and the actual balancing time can be drastically reduced.

Figure 3. A histogram shows the number of rotors and their incoming unbalance condition. Statistics are calculated, tracked with charts and displayed.
Charts for Analysis
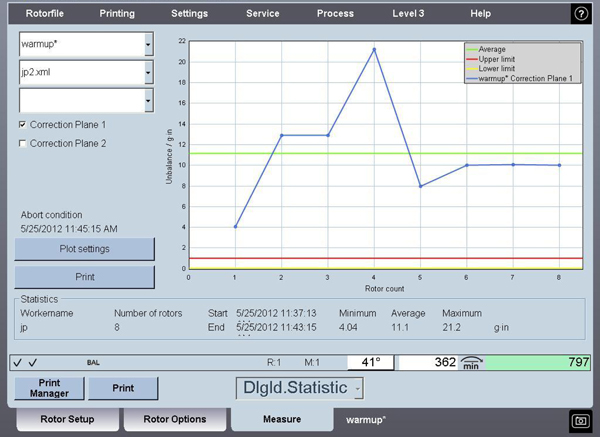
The balancing instrument also charts the mean values of residual unbalance, which allows a graphic representation to help monitor the machine and process performance. The user can intervene in the process to make an adjustment prior to creating excess scrap or rejects. This feature helps with the early detection of a real or potential issue for which prevention is preferred rather than correction after a problem has occurred. The number of runs needed to achieve an in-tolerance impeller can indicate tooling issues, procedure issues, balancing machine errors and calibration errors.
Monitoring the residual unbalance distribution can also be important in determining each impeller’s ideal position along the length of a multistage impeller. The dynamic behavior of the rotor, when the natural frequency of the rotor is close to its running speed (resonance), creates vibration which can lead to catastrophic failure in a multistage pump.
At resonance, there is an amplification of the internal torques/unbalances that each impeller stage imparts onto the system. The optimization of impeller stacking, accomplished by monitoring the residual unbalance distribution, will help reduce the internal bending moments and improve the overall unbalance of the final assembly. Users can analyze the results of the individual impellers and determine their optimized location during the stacking process of the assembly based on the residual unbalance of the other impellers. This helps reduce the moments created by the combination of impellers stacked on the main shaft.

Figure 4. Statistical trend graph for unbalance of correction Plane 1 over a sampling of rotors
Shared Access
With a secure networked connection and a statistical software package running with the balancing machine, a company’s quality control and/or manufacturing and engineering team can monitor, evaluate and share real-time data throughout a facility. With all these features, the balancing instrument can obviously accomplish more than simply measure the unbalance. It can be set up to assist the operator in every step of the balancing process. It can speed up the balancing process, compensate for errors to provide accurate results and collect groupings of data that can be displayed in control charts for further analysis of the entire process.
It also can be used to share the data in a quick, safe and secure manner across a company’s computer network to multiple locations, making the manual input of balancing run data into printouts obsolete. The balancing instrument can be used to help monitor, evaluate and make process control enhancements to improve product quality while saving time and money.


