Sealing Sense - Understanding basic compression packing installation steps
W.L. Gore & Associates Inc.
10/20/2016
Second in a Series You have probably heard the old saying “If you don’t have time to do it right, then you’ll need to make time to do it over.” Understanding basic compression packing installation steps is key to getting the job done right the first time. The goal of this article is to provide an overview of the critical steps necessary to ensure outstanding packing performance. The first step is to remember the “5 Ps of Packing Installation”:
- proper selection
- preparation for installation
- product form
- placement
- patience (and a little pampering)
1. Proper Selection
Several braid configurations, packing fibers and combinations of packing fiber materials are available. Choosing the correct one can be intimidating and confusing. If an equipment manufacturer has not provided guidance or a specification, how do you decide what to use? One acronym commonly used as a guideline when making a packing selection is STAMPS. As cited in the Compression Packing Technical Manual published by the Fluid Sealing Association (FSA), the acronym STAMPS can be used to remember key considerations for selecting a packing material and construction.- Size: What are the stuffing box dimensions?
- Temperature: What is the temperature of the medium?
- Application: What type of equipment is it?
- Media: What medium is being sealed?
- Pressure: What is the internal pressure being sealed?
- Shaft speed: What is the surface speed of the shaft?
2. Preparation
Once the correct packing material has been selected, make sure the pump and accessories are properly prepared for installation of the packing. The stuffing box must be clean, and the worn-out packing must be completely removed. Leftover packing debris can create uneven seating, which can cause leakage or plug the flush port line and lead to overheating problems. Check the stuffing box’s condition, and inspect the shaft or sleeve wear for corrosion, nicks, burrs or scoring. Ensure that the gland follower and fasteners are in good condition. Check other components for cracks or signs of wear that can limit packing operational life. A heavily corroded stuffing box may prevent the packing from sealing because of deviations on the stuffing box’s sealing wall. Corrosion can cause the outside diameter of the stuffing box to become slightly larger, resulting in a poor fit of the new rings. This can lead to the packing rings spinning within the stuffing box and a dramatic increase in leak rate. A damaged shaft or sleeve will not allow the packing to seal properly. Even the highest-performing packing materials cannot function properly on a misaligned or damaged pump shaft and will experience a shortened operational life.3. Packing Form
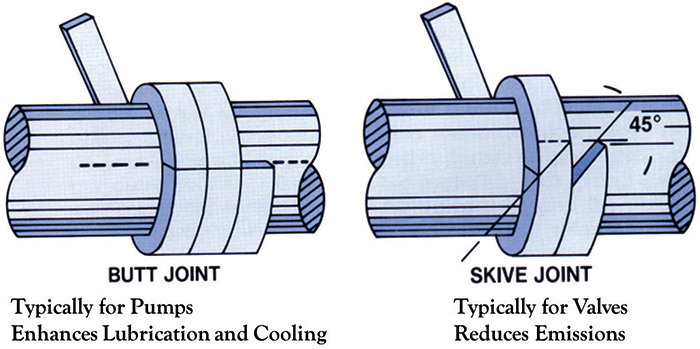
The next step is to determine if the packing rings were cut on-site from bulk spools or if they were preformed by the packing supplier and offered as individual ring sets customized for a specific pump or piece of equipment. When using rings that are cut on-site, ensure that the packing is properly sized. The packing rings must reflect the shaft’s true size. Avoid measuring a used packing ring as a reference to cut a new ring. Doing so can result in an improper cut length because the used ring may have been stretched during removal or it may have shrunk from loss of lubricant during use. Rings should be cut around a mandrel or a calibrated measuring tool equal to the shaft’s diameter. In some cases, the unworn area of a shaft sleeve may be an ideal measurement tool. Rings that are cut too short will leave gaps in the seal along the stuffing box wall and pump shaft, causing excessive and uncontrollable leakage. Rings that are cut too long will not fit into the stuffing box. Use the square “Butt” cut or a diagonal “Skived” cut for the ends (see Figure 1). During installation, stagger the cut ends of each so they are not all lined in a row (45-, 90- and 180-degree offsets). Offsetting the joints will eliminate a possible leak path that could form if the joint ends are all in a straight line. Figure 1. Packing ring joints (Graphics courtesy of FSA)
4. Placement
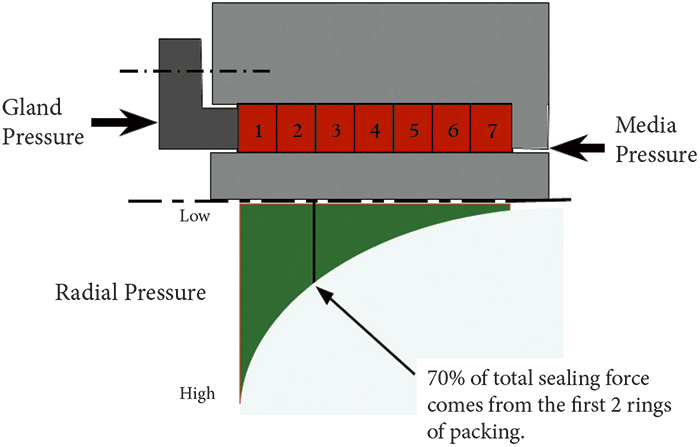
Proper placement, or positioning, is another critical step in packing installation. The first ring sets the stage for the alignment and positioning of subsequent rings. If the first ring is not seated and properly compressed, the remaining rings will be negatively affected for the following reasons:- The required number of packing rings may not fit into the stuffing box.
- Excessive leakage can occur because of gaps in the packing behind the first ring.
- The lantern ring may not line up with the flush port. This can restrict the flow of cooling water.
 Figure 2. Stuffing box radial pressure distribution
5. Patience
Be patient and allow plenty of time when breaking in the new packing material. The startup process takes time and often requires multiple adjustments of the gland follower. Be sure the packing is not overtightened. Too much friction can cause overheating and damage the packing, resulting in hardening or glazing and eventually uncontrollable leakage. Allow a free flow of flush water for initial break-in, and follow procedures recommended by the packing manufacturer. This will allow the packing to conform to the shaft, letting the seating and pressures of the system help define its sealing area. Liberal leakage during the first two hours of operation will result in an excellent packing job and help it function for a longer period of time. Begin gradual tightening of the gland follower to bring the system to an acceptable leakage rate. Use small incremental adjustments (one wrench flat turn at a time) on the gland nuts as the packing seats itself and leakage is reduced to the level required for the selected material class. Leak-rate capabilities can vary by material and manufacturer, but rates of eight to 10 drops per minute per inch of shaft diameter are typical. Lower leak rates can be achieved based on material and manufacturer selection, but be sure to verify this prior to installation. Allow sufficient time between adjustments for the leak rates to stabilize. Check leak rates after a few hours of operation, and continue to make small gland adjustments to decrease the leak rate to the desired level. Keep checking the stuffing box temperature. A high temperature may indicate that the gland follower is overtightened. This can burn up the packing and damage the shaft or sleeve. Excessive gland load can result in increased power loss because of friction, reduced life and/or sudden premature failure in service. In some cases, the outside contractors hired to repack pumps during major turnarounds are not present when the shutdown is completed and the pumps are started. In their absence, it can be difficult to tell how the gland nuts were tightened (i.e. gently or highly loaded). For this reason, startups require close monitoring to allow the packing to be properly broken in. Following these basic guidelines will result in extended packing life, reduced downtime and lower maintenance costs. Next Month: Back to Basics: Soft Gaskets (Find other articles in this series here.) We invite your suggestions for article topics as well as questions on sealing issues so we can better respond to the needs of the industry. Please direct your suggestions and questions to sealingsensequestions@fluidsealing.com.
See other Sealing Sense articles here.

