Often in the deployment of bolted flange joints, the end user is supplied with a targeted gasket stress with little appreciation for the compensations that are, or should be, included in deriving this stress. The informed end user realizes that there can be many such compensations. In all cases, it is important to understand the state of stress of the bolts and flanges.
The following is a two-part article that addresses the subject of bolt strength resulting from gasket stress compensations. Part 1 provides an explanation of the testing characteristics of both ductile and brittle bolting materials. Attention is drawn to the definition of yield and ultimate strength. Various types of bolting compensation are then discussed.
In Part 2, an example is provided on how to evaluate the resulting bolt load for each of these compensations. They are then tallied and a final check on the state of tensile stress in the bolt material is made.
Bolt Strength
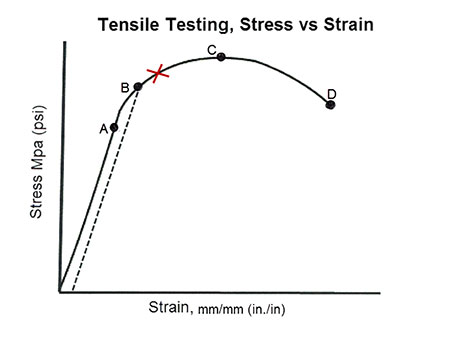
Bolting strength is a first consideration. Image 1 identifies the most important strength properties of a bolt, from initial tightening to full fracture. The plot is created at ambient temperature and shows the relationship between stress (force/area) and strain (change in length/initial length) as the bolt load is increased. The relationship is linear, initially. Full elasticity is maintained over this range. When the load is removed, the bolt returns to its original length.

Location A in Image 1 is defined as the proof load. This is a percentage of yield strength, typically between 85 percent and 95 percent—90 percent is a common value. Bolt loading at or below the proof strength ensures the material remains below its yield value and within its elastic region.
Location B identifies the yield strength of the material. Its value is most often defined by a 0.2 percent of plastic strain. This property is identified by a line that parallels the initial loading line (shown as the dashed line), but with a 0.2 percent offset and the intersection of the stress strain plot. Note: The yield strength is not the initial point of yielding. It represents the point at which a small amount of yielding has already occurred. Hardening of the material begins to take place and there is elasticity loss. The bolt will not fully return to its initial length when unloaded.
Location C represents the highest value of load the bolt can sustain. This is known as the bolt’s ultimate strength (aka, tensile strength). There is a reduction in bolt area (necking down) in progress as stretching continues.
Location D indicates the instant when the reduced area can no longer support any load and the bolt suddenly fractures into two pieces.
It is important to appreciate that Image 1 is based on ductile bolting materials. Brittle materials result in a different relationship. For brittle materials, point X becomes the point of fracture. This occurs sooner after the yield strength is reached. Now consider some typical bolt loading compensations necessary to account for a loss in gasket stress.
Temperature Effects
Elevated temperatures reduce the rigidity, and therefore the strength of bolting material. The effect can be severe. At elevated temperatures, the bolt will lose some of the stretch created during its initial load. This loss of stretch effectively relaxes the bolt. This relaxation results in a loss of the load to the gasket.
Image 2 shows how both yield strength and Young’s Modulus of Elasticity are negatively affected at elevated temperatures. The table is based on ASTM A193 Grade B7 bolting, with a nominal diameter of 2 1/2 inches or less. Initial bolt-up temperature and percentage changes are based on 70 degrees F.

The change in yield strength is intended to be informative. It is the change in the modulus of elasticity that directly affects the strength of the bolt. The bolt strength changes as the ratio of initial and final modulus of elasticity changes. For example, if a 3/4-inch-diameter B7 bolt is initially torqued to 200 feet pound force (ft. lbf.), the effect of 400 degrees F is to lower the bolt load by ~ 5.7 percent (11.4 ft. lbf.).
Gasket Creep & Relaxation
Over time, and at elevated temperatures, the compressive energy in the gasket will typically reduce due to creep and relaxation of the gasket material. The dimensional change from creep, and the reduction in stress from stress relaxation, will lower the bolt load that proceeded these events. Some adjustment to the initial bolt load is required to compensate.
Cyclic Loading
Cyclic loading of the bolted flange joint caused by startups and shutdowns and/or thermal cycles will also reduce the bolt load over time. This effect is often not accounted for. Especially for batch services, compensation may be warranted. Failure to include compensation can result in leakage, which may be inaccurately attributed to other causes.
Equipment Misalignment
Equipment misalignment can be one of the most significant causes of preventing the intended bolt load from being converted into clamping load. American Society of Mechanical Engineers (ASME) PCC-1 provides guidance on misalignment limits.
There are many reasons alignment of an older piping system may become excessive. Also, be cautious because even new piping systems may not acquire the alignment specifications intended of a new installation. An appreciable portion of the bolt load ends up pulling mating flanges into place, rather than creating the intended clamping load on the gasket.
A torque wrench can only measure the energy that passes through it. It cannot indicate which portion is converted into clamping load. Additional bolt load is necessary to develop the intended gasket stress.
Surface Irregularity
The bearing surfaces of a bolting system are never perfectly smooth. A magnified view of the surface of bolt threads, nut spot faces, washers and flange will show these surfaces to be irregular. Image 3 provides graphical examples of these surfaces.

These surfaces are composed of a random series of peaks and valleys. The challenge to maintaining a clamping load is that, over time, these surfaces are compressed together. These irregularities will yield and embed into one another. Though the resulting change in axial displacement is small, so too is the amount of original bolt “stretch.” This loss of stretch effectively lowers the bolt load. Including compensation provides yet another measure of protection to maintain a successful value of gasket stress.
Part 2 of this article will discuss bolt strength and the type of compensations that might be considered to adjust the initial gasket stress in greater detail. Example calculations will be provided to enumerate each. The combination of these compensations will then be used to evaluate the resulting tensile stress in the bolting material.
We invite your suggestions for article topics as well as questions on sealing issues so we can better respond to the needs of the industry. Please direct your suggestions and questions to sealingsensequestions@fluidsealing.com.
Read more Sealing Sense articles from the Fluid Sealing Association.

