Back to Basics hero image
Follow these tips to help keep gremlins away from your system.
CIRCOR Industrial Group Americas

Many pump startups are the culmination of months, if not years, of work to design the process, machine or system; specify components, instrumentation and protective devices; and review and qualify suppliers. It is also the most vulnerable time for any pump. Part I of this article describes cautions, reviews and inspections for three main components that should be conducted before startup to help ensure that gremlins of pumping systems are identified and eliminated. In a future issue, Part II will give additional tips on how to prevent delays and other, last-minute pointers to ensure successful startup of rotary pumps.

Piping & Valves

Be sure that all the required valves have been installed. Verify that none are installed backwards. An absent or reverse-mounted check valve, foot valve or relief valve can cause serious damage. Piping should be cleaned and inspected after fabrication to ensure that weld beads, weld rod, scale, wombats and any discarded tools/materials have been removed. Small, hard weld beads can cause catastrophic pump failure should they become lodged in the wrong pump clearance.

Ideally, the entire piping and valve system will be thoroughly flushed to remove all dirt and fabrication debris. This is customarily conducted with a flush pump, not the normal system pump. Strainers and/or filters are installed at appropriate locations, and dirt accumulation is monitored until they show no accumulation for a period of 24 hours. Flushing usually uses light, fairly hot (150 F/65 C) oil delivered at flow rates higher than the system design. The higher flow rates cause higher liquid velocities within the piping system and are more likely to dislodge debris.

pipeline installation
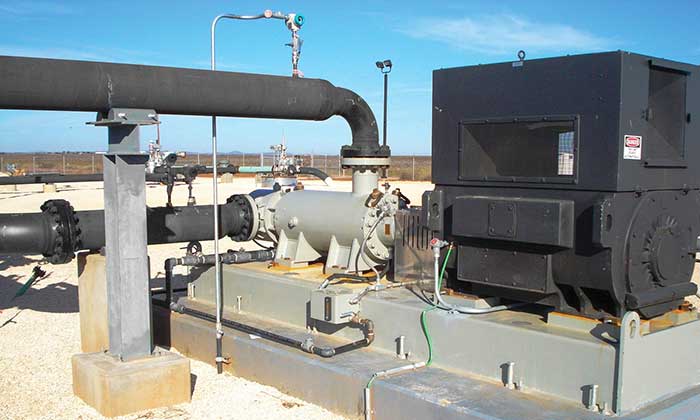
Image 1. Three-screw positive displacement pump in pipeline installation (Image courtesy of Circor)

Some systems use vibration equipment to impose mechanical “shaking” on the piping, again to maximize the dislodging of dirt. Extensive piping systems have been known to show debris accumulation even after 30 days of flushing (hence the need for the startup strainers discussed later). Because of their long distances and relatively huge holding volumes, pipeline systems frequently use bullet-shaped pigs, sometimes equipped with wire bristles, which are propelled ahead of a flush or initial product batch of liquid to scrub debris and dirt from the inside of the pipe.

If permanent pump inlet strainers are not part of the system, a temporary strainer must be installed. It is not unusual for supposedly clean suction piping to dump damaging debris into an expensive pump. Pump manufacturers can easily locate the source of debris from the subsequent damage. Rest assured such failures are seldom (if ever) covered under warranty.

The strainer sizing and mesh used are critical to it successfully performing in a startup. The recommended commissioning (temporary) strainer mesh size depends on the fluid viscosity and is:

  • Viscosity Use 60 mesh (0.010 inch, 0.25 millimeter [mm] opening)
  • Viscosity >450 SSU (86 cSt): Use 40 mesh (0.017 inch, 0.42 mm opening)
  • Viscosity >1000 SSU (216 cSt): Use 20 mesh (0.033 inch, 0.84 mm opening)

Operators should continuously monitor the pressure drop across the suction strainer and limit the pressure drop across the strainer to 10 pounds per square inch (psi) or 0.7 bar, or the vapor pressure of the pumped fluid.

Consider the system flushing to be complete when the strainer pressure drop stabilizes, and periodic inspection of the strainer confirms that any accumulation of debris has stopped. At this point the commissioning (temporary) suction strainer can be removed.

The piping system should be pressure tested and should never exceed the design limits of any system component. For example, some pumps can withstand discharge pressure only on the discharge side and inlet piping may be a lower pressure class. Verifying the allowable maximum pressure on the general arrangement drawing or equipment nameplate is a good practice to help ensure the pressure test about to be undertaken will be safe and not damage equipment.

The pressure test medium should be compatible with the components/system to be tested. For example, do not use water if the system is not a water system. A low pressure (15 pounds per square inch gauge [psig]) compressed air test may be adequate to find missing flange gaskets or other obvious leak sources.

Pump inlet and discharge piping should have been made up from the pump for a distance of perhaps 20 feet (6 meters) to minimize pipe strain on the pump. Piping should also be independently supported.

piping misalignment
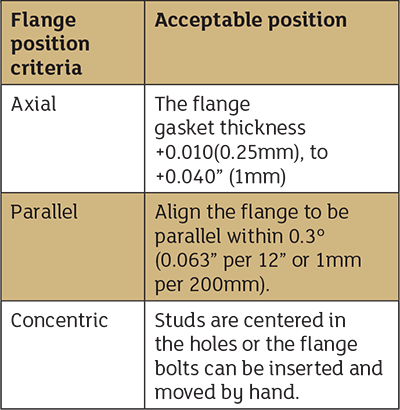
Table 1. Allowable piping misalignment

Contrary to the opinion of many piping engineers, the pump is not designed to be a pipe anchor. Never draw piping into place at the flanged connections of the pump. This can impose dangerous strains on the unit and misalignment between the pump and driver. Pipe strain adversely affects the operation of the pump, which can result in damage to the equipment and is potentially a safety risk. Limit the allowable piping misalignment to those in Table 1.

Check and tighten all flange bolts to specified torque.

If the criteria in Table 1 cannot be achieved, rework the piping until they are. Do not just run all the nuts and bolts tight with an impact wrench and hope for the best. Hope is not an acceptable strategy for successful, reliable system operation.

Positive displacement (PD) pumps will normally have an integral pressure relief valve or a system pressure relief valve installed from the discharge piping to either the source of the pumped liquid, such as a supply tank, or to the pump inlet piping (a less desirable point due to the potential for temperature buildup during relief valve operation). This valve will usually be set slightly higher than the maximum anticipated normal system operating pressure (typically 10 percent higher). If possible, verify that it has been properly set. If this cannot be verified, consider adjusting the relief valve to a low pressure and changing it upward after pump startup. Consult the relief valve vendor’s technical data to be sure valve adjustment is done in the correct (to lower pressure) direction.

Foundation, Alignment & Rotation

It is hard to overemphasize the critical importance of a good quality foundation and grout installation to reliable long-term operation of the pump. There are plenty of resources (such as API RP 686 Chapter 5) to help. Refer also to the manufacturer’s installation, operation and maintenance manual (IOM) for specific guidance on the equipment requirements. Normally, the pipework should be connected and equipment should be aligned prior to grouting. Skipping this step can result in the need for expensive rework of the piping, baseplate machining or even the need to strip everything back and regrout.

Never rely on the alignment that was produced where the pump and drive train were assembled. Transportation, lifting and handling as well as installation and grouting practices can all potentially affect alignment, usually in an undesirable way.

Be sure to consider thermal expansion of the pump and driver when performing any shaft alignment. The manufacturer’s IOM should detail the offset values to consider when compensating for thermal growth during the alignment process.

thermal expansion
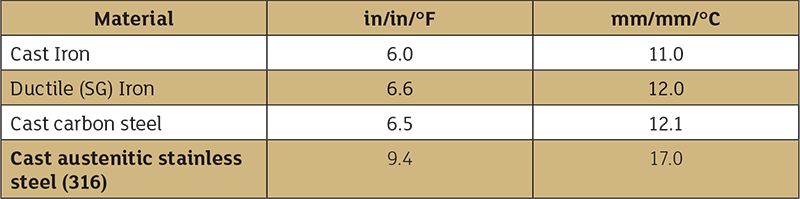
Table 2. Coefficient of thermal expansion for different materials

Shaft-to-shaft alignment (cold) should incorporate a deliberate, compensating offset, so that alignment is more nearly correct when equipment is up to operating temperature. The coefficients of thermal expansion for common pump case materials are provided in Table 2.

An example of a typical calculation is shown below:

  • Worked example (U.S. units) ambient temperature: 80 F
  • Operating temperature: 224 F (driver, taken from the max temperature for Class B)
  • Operating temperature: 100 F (pump)
  • Material of construction: cast austenitic stainless steel (pump)
  • Material of construction: cast steel (driver)
  • CL height pump: 13 inches
  • CL height driver: 11 inches
  • Change at pump shaft due to temperature rise = 8.9 x10-6 x (100-80) x 13 inches = 0.002 inch
  • Change at driver shaft due to temperature rise = 6.5 x10-6 x (224-80) x 11 inches = 0.010 inch
  • Difference = 0.002 inch – 0.010 inch = -0.008 inch
alignment values
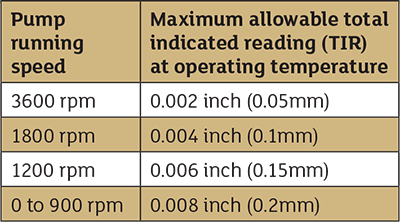
Table 3. Alignment values

In this example, the pump should be set 0.008 inch (0.2 mm) higher than the driver to allow proper alignment at operating temperatures.

The purpose of any shaft aligning procedure is to align the centers of the machine shafts with each other, not to align the flexible coupling hubs. At normal operating temperature, alignment should be within the tabled value of total indicator reading (TIR), both angular and parallel.

The fact that the coupling may be rated to a much greater misalignment capability has nothing to do with the shaft-to-shaft alignment of the equipment. Survival and longevity of the machinery, not the coupling, are the objectives.

A final alignment check should be made as nearly the last step before actual starting of the pump.

A final check for “soft foot” should also be made at this stage. Place a dial indicator on the foot to be checked and loosen the hold down bolt at the foot on which the indicator is reading. If the indicator shows movement of greater than 0.002 inch (0.05 mm) the foot is said to be “soft.” In this situation, shim under the soft foot to reduce the indicator travel to less than 0.002 inch (0.05 mm). If multiple shims are already in place, the use of fewer, thicker shims will reduce the tendency for soft foot to occur.

Always recheck alignment after the pump and driver have been at normal operating temperature long enough for thermal growth to have stabilized (typically two to four hours depending on equipment size). To do this, shut down the equipment and verify that alignment is within the prescribed limits.

If equipment is to be dowelled in place, do so to the pump only after several days of good operation and hot alignment checks.

Direction of rotation is critical for most equipment. It is usually indicated by arrow nameplates. Remember that some gearing will reverse rotation from input shaft to output shaft. Most engines and turbines must be purchased for a specific direction of rotation. This is also true of most pumps. Smaller AC electric motors are frequently bidirectional; their direction of rotation will depend on how the power cables are connected. However, this is not always the case for larger motors that may have unidirectional fans.

It is not always possible to be 100 percent certain of motors’ direction of rotation beforehand. Hence, it is recommended that the flexible coupling at the motor shaft be disconnected and the motor momentarily energized (jogged on, then immediately off) to see if its rotation is correct for the rest of the driven equipment. If not, two of the electric power cables will need to have their connections reversed. Verify correct rotation after reversing, if necessary, before reengaging the flexible coupling. Motors driven from variable frequency drives (VFDs) do not need cable reversal as the VFD software usually offers control over the direction of rotation.

Lubrication Basics

Most rotating machinery has some form of lubrication for its bearing systems. It may be as simple as a permanently grease-packed, sealed ball bearing or as complicated as a separate lubricating oil pump system complete with cooler, filter and instrumentation. Be sure to verify that any lubrication required has been addressed. Equipment that has been in storage may require draining and addition of fresh lubricant or even flushing out.

Any gearing present (e.g., pump timing gears or reduction drive gears) should be reviewed for the presence of the correct type and quantity of lubricant. Constant level oilers should be filled to their mark with clean, moisture-free lubricant of the correct type.

Any lubricant added to new equipment should have an ISO 4406 cleanliness of at worst 14/13/11 and a moisture content of In a Future Issue
As stated earlier, Part II of this article will give additional tips on how to prevent delays and other, last-minute pointers to ensure successful startup of rotary pumps.

Read more Back to Basics articles by clicking here.