In Part 1 of this article, we discussed the various components of a packaged system. Part 2 of this article will focus on the types of systems as well as the installation and operation. It also includes questions to help you make a proper selection.
Simplex (1 Pump) or Duplex (2 Pumps)?
What happens if the pump fails? This is the best question to ask a user if they are debating between a simplex and duplex system. Duplex systems with two pumps offer 100% redundancy with a lead and lag pump and in the event of a pump failure will still maintain operation. Duplex systems with alternators or control panels extend the life of the system by switching between pumps with each cycle. Naturally, duplex systems are generally considered to be better, but they do come at an added price. If the user is budget conscious, it is often useful to ask them what would happen if a pump failed. If a commercial user would have to stop service and turn away paying customers, the added cost can be justified. For the homeowner, if all they need to do is reduce water usage for a few hours, then the added cost may not be necessary.
Pro tip: For all duplex applications that are designed with 100% redundancy, either combine the lag and alarm float or place it slightly below the lag float so the owner will be notified that one pump is not able to keep up and needs service.
Installation & Operation
It is vital to check local codes, regulations and manufacturer installation instructions and to identify underground utilities prior to installation. Confirming that proper electrical power has been provided by an electrician is also a must. For single phase systems, it is recommended that separate incoming power sources be brought for the pump and the alarm/control circuits.
Once proper power has been confirmed, excavate a hole larger in diameter than the basin being installed (minimum 8 inches wider for indoor and 24 inches for outdoor). Dig deep enough to allow room for the compacted sub-base or concrete pad so the top of the basin aligns with the finish grade. Set the basin and ensure all elevations are correct. If they are not, adjust as needed. Plumb and wire all components, making sure the power is off at the circuit breaker. Backfill with appropriate material—1/8-inch to 3/4-inch pea gravel or 1/8-inch to 1/2-inch crushed stone is typical.
For indoor installations, the finished floor will typically be poured around and flush with the top of the basin. Outdoor installations will be backfilled to the top of the basin, with the finished grade sloping away from the basin to prevent runoff from leaking inside. Outdoor installations in areas with a high water table may require a concrete ballast. Check local codes or engineer specifications.
Local plumbing code will dictate the size and type of pipe allowable, but a general safe bet is to match the discharge diameter of the package system. The size can be increased as needed, but rarely should the size of the discharge be decreased. The discharge for solids handling pumps should be greater than or equal to the size of solids they pass. Two inches is typical of residential solids handling pumps, though larger pumps can pass larger solids. Grinder pumps grind the sewage into a fine slurry and can be used with pipe as small as 1.25 inches.
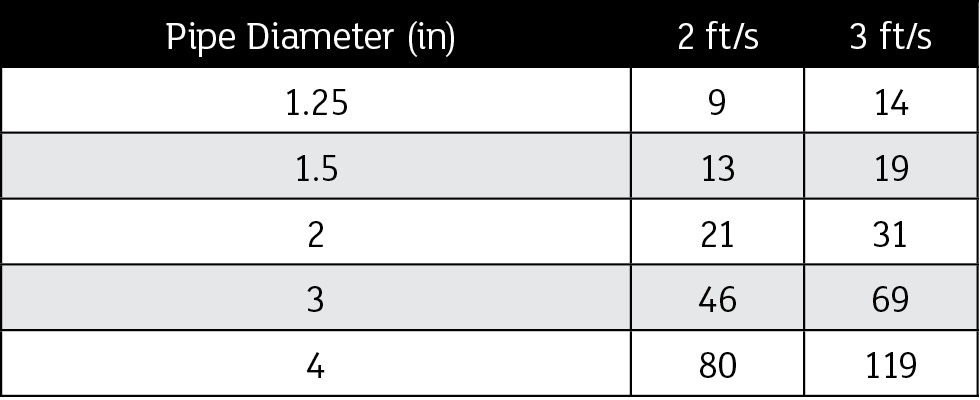
An important design criterion is scouring velocity. Scouring velocity varies with diameter and determines the minimum flow needed to keep the pipes clean and the solids moving along. The chart in Image 4 gives the flow rates required to achieve 2 feet per second (ft/s) and 3 ft/s scouring velocities. A scouring velocity of 2 ft/s or greater is required for all sewage applications, although 3 ft/s is better.
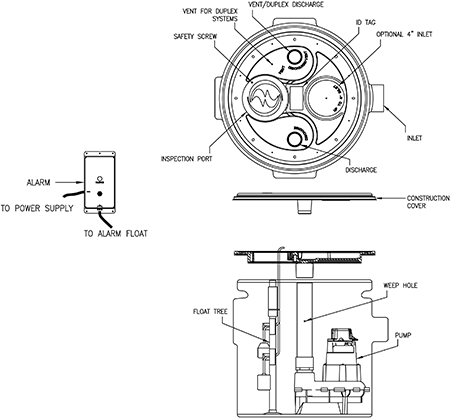
Inlets, vents and pump discharges typically pass through the cover for indoor installations. Be sure to include unions on each connection, so in the event the cover needs to be removed, it can be done easily. Basins with inspection ports and a removable float tree provide easy access and allow troubleshooting and maintenance without removing the lid.
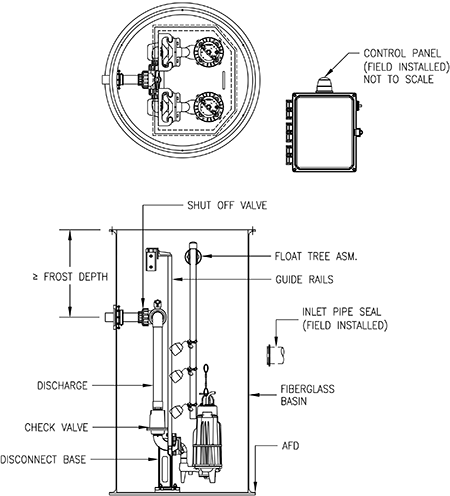
For outdoor installations, all plumbing typically passes through the side of the basin at or below the frost depth to prevent freezing and does not interfere with removal of the basin lid. However, unions, disconnects or rail systems should be used for any serviceable item. Rail systems are common in outdoor basin packages to offer a simple, tool-free way to remove pumps.
Every component of a packaged system could warrant its own individual article, but hopefully this has served as a good general overview. If you have additional or job-specific questions, reach out to the manufacturer and work through the process with them. In the next article, we will discuss larger commercial and municipal packaged systems with a focus on sizing and selecting the basin.
Questions:
1. What are the electrical conditions?
Typically, residential applications will have 120/240 volt (V) single phase power. Light commercial applications may have access to three phase power. Running a pump with incorrect power can be an electrical hazard and shorten the life of the pump.
2. What type of fluid is being pumped?
Is it sewage, effluent, groundwater or some other liquid? Be sure to select a pump that is designed to operate in the given environment.
3. What is the design flow?
For residential and light commercial, the fixture unit method is most used.
4. What is the static head?
The vertical distance between the pump and outfall. This is the difference in elevation only and has nothing to do with the length of pipe or horizontal distance.
5. How far is the water being pumped?
The total length of pipe between the pump and outfall.
6. What diameter and type of pipe is being used?
Friction loss differs based on the material and diameter of the pipe.
7. What type and number of fittings are included?
Used to determine the total equivalent length for the friction loss calculation.
8. Where is the water being pumped?
Is the water being pumped to a gravity sewer, septic tank, pressurized system, etc.? Additional pressure requirements will need to be accounted for in the pump sizing.
9. What is the inlet depth?
This will impact the overall depth of the basin.
10. What is the frost depth?
Applicable to outdoor installations. The discharge of the basin should be at or below this level to prevent freezing.