


Air-operated double-diaphragm pumps (AODD) are preferred in transfer applications because their simple design makes them easy to operate and cost-effective to repair. To achieve top performance, end users must install and operate these pumps correctly. In a matter of minutes, common issues can be corrected with the right information.
Here are six quick steps that can help you fix common problems during installation and operation.
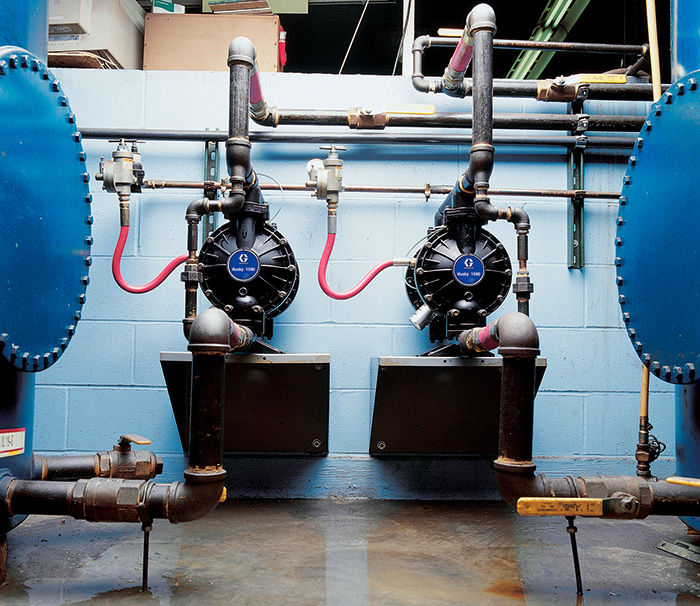 Image 1. Chemical transfer with air-operated double-diaphragm pumps (Images and graphics courtesy of Graco Inc.)
1. Check the inlet air line size and pressure.
Installing an air line that is too small is the most common mistake users make when installing an AODD pump. Using too small of an air line will starve the pump of the fuel—compressed air—it needs to operate at peak performance. Upgrading to a larger air line is an easy fix that takes a few minutes.
Double-diaphragm pumps come in all shapes and sizes, based on the application and fluid requirements. Larger AODD pumps (1-inch and greater) require more compressed air and larger air lines than smaller pumps to operate at full capacity.
The appropriate air line size for a pump is located in the manufacturer’s installation and operation manual. As a general guideline for AODD inlet air line sizes, match the air line hose size to the air inlet port size on the
air valve.
Inlet air pressure also plays a key role in getting the most out of a pump. Diaphragm pumps operate on a 1-to-1 ratio, meaning the pressure of the inlet air feeding the pump is directly related to the fluid pressure at the pump’s outlet. For example, if the target outlet pressure of a 1-inch, 50-gallon-per-minute (gpm) pump is 100 pounds per square inch (psi), the inlet air pressure entering the pump’s air valve must be greater than or equal to 100 psi.
System backpressure and fluid viscosity will impact the outlet fluid pressure. Too little backpressure may cause the pump to run inefficiently because the ball checks may not check as quickly. Too much backpressure can cause the pump to stall if the fluid pressure overcomes the air pressure to the pump.
To control the performance (flow and pressure) of an AODD pump, install an air regulator assembly to control the incoming air pressure (see Figure 1, C). Installing the correct air line size with an air regulator will solve the most common AODD pump installation problem.
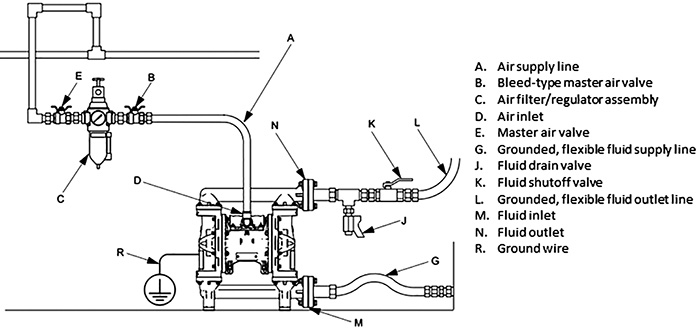 Figure 1. Recommended installation of an air-operated double-diaphragm pump
2. Inspect for muffler icing and restrictions.
Diaphragm pumps can generate high decibels at full speed, a main reason mufflers are recommended during installation. The AODD air motor requires compressed air to operate. As the compressed air enters the air valve and channels through the pump center section to exhaust through the muffler, rapid temperature changes occur. At the muffler exhaust, air temperature is below freezing and can cause icing-related issues that are common in humid environments.
Erratic pump operation, inlet air with high levels of moisture or visible frost on the outside of the muffler are indications of an icing-related issue that is decreasing pump efficiency. Here are suggested solutions to eliminate these issues:
- Decrease the air pressure to the pump.
- Increase the pump size to operate at lower speeds (i.e. lower air pressure).
- Exhaust air to a remote location using an exhaust port tube.
- Add an air line filter with a water catcher and drain to collect condensation.
- Install an air line heater to raise the exhaust air temperature above freezing.
- Adjust the pressure dew point temperature with an air compressor dryer.
Solutions to icing can range in difficulty depending on the application and environment, but reducing the air pressure to the pump is one of the quickest and most effective ways to reduce icing.
3. Inspect sealing surfaces for leakage.
A wise maintenance technician once said, “There are two types of pumps—those that leak and those that are going to leak.”
Leakage is a common problem in all pump types. A few simple fixes can ensure the fluid stays in an AODD pump. First, pumps, especially plastic pumps, must be torqued to the manufacturer’s recommended rating. Materials relax over time—often referred to as cold flowing—which can cause sealing surfaces to loosen and create leak paths. Refer to the pump manual for torque values, and follow the bolting patterns to reduce the threat of leakage.
Reuse of polytetrafluoroethylene (PTFE) O-rings is another cause of leakage at sealing surfaces. A downfall of PTFE is resilience. Once a PTFE O-ring has been compressed, it is not capable of regenerating its original shape. Replace all pump PTFE O-rings when servicing an AODD pump.
After properly torquing the pump according to manufacturer recommendations and ensuring all sealing O-rings have been replaced after service, the AODD pump should be leak-free. Save significant rebuild time later on by ensuring the PTFE O-rings are replaced when the pump is rebuilt.
4. Ensure proper tubing and piping size.
Pump inlet and outlet fluid port diameters vary based on the flow rate required. Inlet and outlet hose sizes must match the pump’s size. A primary concern is the risk of cavitation, which can increase repairs and maintenance costs. Changing tubing and piping size after installation is relatively fast. Knowing the correct size at installation eliminates the time and effort required to make a modification later.
For example, if a 1-inch pump has a half-inch inlet hose connected, the pump will not be able to operate at full capacity without the risk of cavitation. This risk increases dramatically as the desired fluid viscosity rises. In this example, the 1-inch pump should have a 1-inch inlet and outlet hose attached to prevent cavitation.
It is also recommended that an AODD pump be installed with a flexible inlet/outlet connection rather than being hard plumbed. As pump speed increases, vibration increases, which elevates the risk of loosening a hard plumb connection, creating the potential for leakage.
5. Slow the pump down to prime.
AODD pumps are popular when self-priming is required. Creating a low-pressure zone—less than the atmospheric pressure of 14.7 psi—inside the fluid bowls is how the AODD pump draws fluid. If air pressure supplied to the pump is too high, the pump will change over too quickly and there will not be enough time for the fluid to be drawn into the pump.
To solve this priming issue in a matter of seconds, slow down the pump by using the air regulator to decrease the air pressure entering the air valve. Once the pump speed has been reduced and the fluid has had enough time to enter the pump, increase the air pressure and operate the pump at a faster speed.
6. Clear any fluid line restrictions.
Certain restrictions create backpressure that may negatively affect the pump and potentially create cavitation that will increase maintenance. Take a minute to inspect the pump and connected piping to ensure there are no visible restrictions. Look for the following at both the pump’s inlet and outlet:
- closed or partially closed valves
- clogs or kinks in the line
- too much hose or length of distance
Listen carefully to the pump as it operates. Listen for erratic operation, which may be caused by an inlet hose that is too small or a problem related to icing. Hearing what sounds like gravel running through the pump or seeing flashing around the manifold elbows indicates cavitation and the need to correct the inlet or outlet tubing size or reduce the pump speed. Also, be sure to keep an eye out for kinks in the inlet and outlet lines or any valves that could be closed or restricted.
Spending a few minutes up front to ensure proper installation will save a tremendous amount of time correcting problems later. Following these steps can help end users spend less time trying to figure out problems with their AODD pumps and more time pumping.
See other Maintenance Minders articles here.